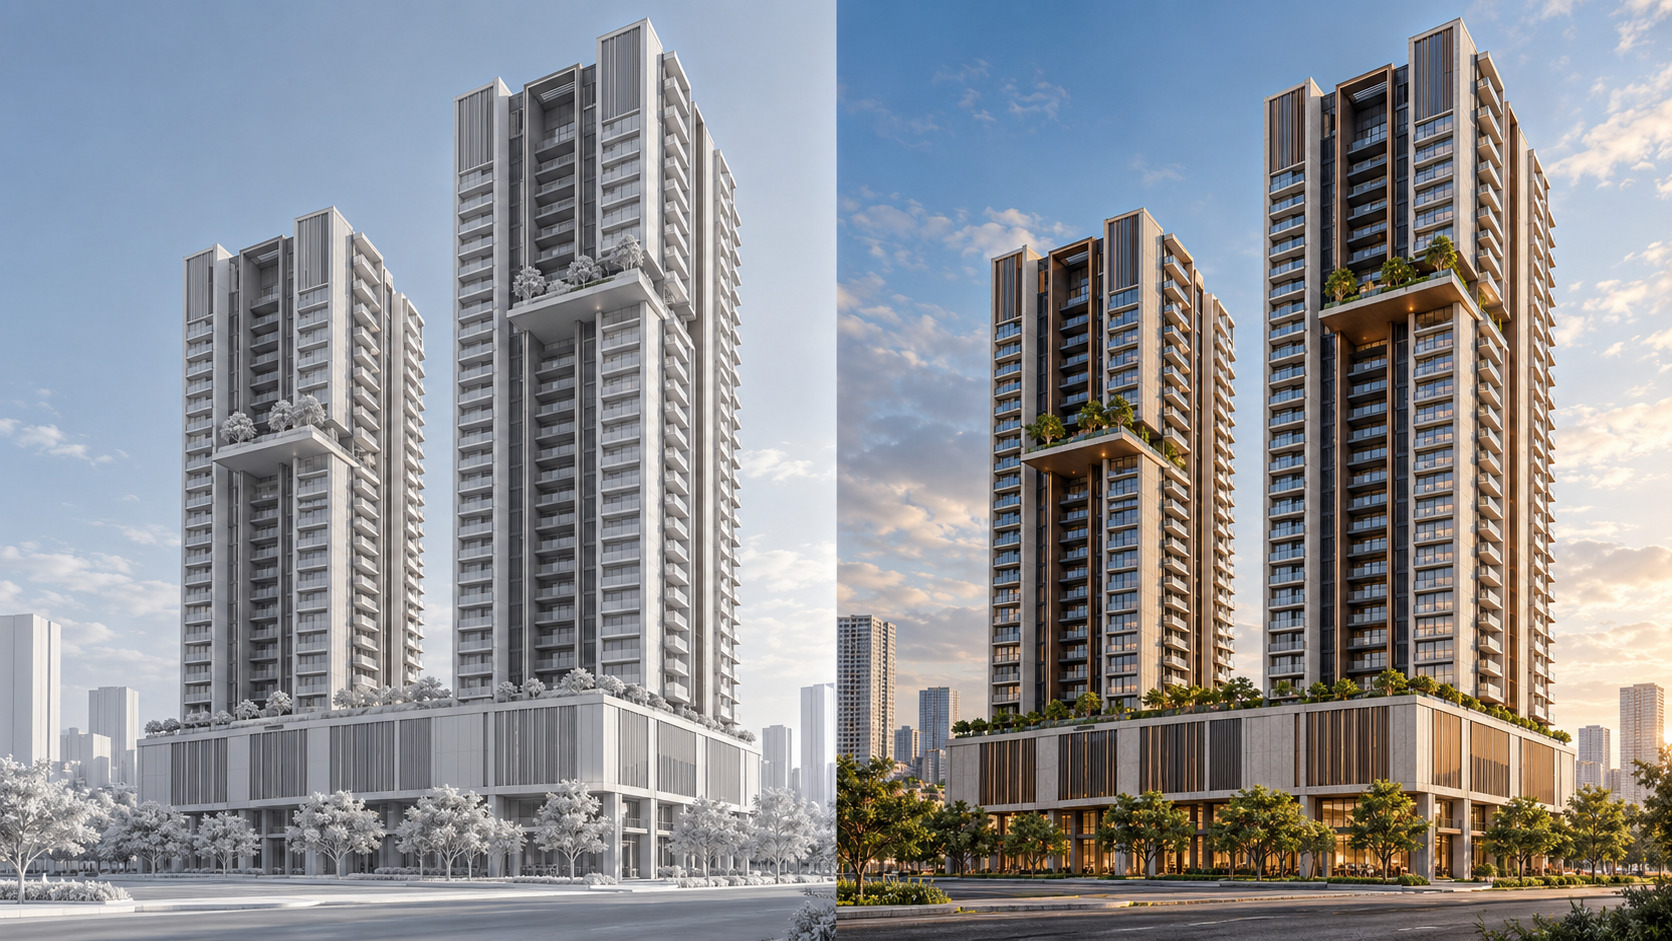
Turning an illustration into a convincing architectural image sounds straightforward: keep the building, add realistic materials, improve the sky and make the lighting photographic. In practice, architectural rendering from reference image is a design-control task before it is a realism task.
The greatest risk is not that the final image looks insufficiently polished. It is that the process quietly changes what the architect or developer intended. A taller tower becomes wider. A sky garden moves to a more convenient floor. Repeated balcony bays lose their rhythm. The camera shifts enough to make the building feel more elegant—but no longer represents the approved view.
A professional result therefore needs two standards at the same time: visual credibility and design fidelity. Realism should strengthen the proposal, not replace it with a more photogenic invention.
The Commercial Problem: A Better Image Can Still Be the Wrong Image
Reference material is often supplied because a design already exists but the current presentation is not strong enough for an approval meeting, marketing discussion or stakeholder presentation. The request may be to convert a sketch, competition illustration, AI concept or early render into something more photographic.
That wording can hide two very different scopes:
- Representation development: preserve the design and improve materials, lighting, landscaping, atmosphere and realism.
- Design development: revise the architecture, proportions, façade or planning to create a stronger proposal.
Both can be valuable, but they are not interchangeable. If the client requested the first and receives the second, the image can create false expectations, delay approval or force the design team to explain features that never existed in the drawings.
The brief should therefore state whether the reference is an approved design source, an approximate visual direction or simply a mood reference. That one distinction determines how much interpretation is appropriate.
What Must Stay Fixed in Architectural Rendering from Reference Image
Before changing any surface, identify the design invariants: the elements that must remain recognisably and measurably consistent.
For a multi-tower exterior, these usually include:
- number and location of towers;
- relative tower heights and widths;
- spacing between buildings;
- podium footprint and height;
- major setbacks and massing breaks;
- roof profiles;
- position and depth of sky gardens;
- balcony and window rhythm;
- primary vertical and horizontal façade elements;
- camera position, horizon, focal character and crop; and
- relationship between the development and the visible site.
This list is more useful than the instruction “keep it the same,” because it creates specific review points. It also separates architectural information from decorative content that can be developed more freely.
Build a hierarchy of truth
Not every reference carries equal authority. A rendered illustration may be visually clear but geometrically approximate. A plan may confirm tower spacing but not height. An elevation may show the façade rhythm accurately while an old 3D model contains superseded details.
The project team should agree on a source hierarchy, for example:
- Latest approved drawings and written revisions
- Current coordinated 3D model
- Architect-approved elevations and façade details
- Reference illustration for framing and mood
- General style references
When sources conflict, the visualizer should flag the issue instead of choosing whichever version is easiest to render. This is part of professional risk control, not a delay to production.
Match the Camera Before Judging the Architecture
Perspective is one of the easiest places for design drift to hide. A small change in field of view or camera height can alter the apparent slenderness of a tower, the width of the podium and the spacing between buildings.
Before refining the model, compare:
- horizon height;
- principal verticals;
- left and right vanishing directions;
- visible proportions of the front and side façades;
- amount of foreground;
- roof and podium crop; and
- tower positions within the frame
Autodesk’s official Perspective Match Utility documentation explains that 3ds Max can use a background image to orient a camera so its position and field of view match the image perspective. The tool supports alignment, but the visualizer still needs to judge whether the reference itself is reliable, cropped or optically exaggerated.
Camera approval should happen early. If it changes after detailed modelling and landscaping, the team may discover that previously hidden façades, roof areas or podium edges now require additional work.
Audit the Silhouette Before the Details
Fine materials cannot rescue incorrect massing. A useful review begins with the largest relationships and moves toward smaller ones.
Level 1: Overall silhouette
Check the total height, width, top profile and negative space between towers. View the image at thumbnail size. If the development no longer reads like the reference, the problem is structural rather than decorative.
Level 2: Major massing
Compare podium height, tower setbacks, projecting volumes and sky gardens. These elements create the project’s identity and strongly affect shadow behaviour.
Level 3: Facade rhythm
Review the repetition and spacing of balconies, windows, fins and vertical frames. Generative tools and rushed manual reconstruction can create attractive local details while gradually changing the overall pattern.
Level 4: Secondary elements
Only after the larger levels are stable should the team review railings, mullions, planters, soffits, lighting and smaller material junctions.
This order prevents a familiar failure: spending hours perfecting glass reflections on a building whose proportions are still wrong.
Improve Materials Without Changing Form
Photorealism comes from believable relationships between scale, roughness, reflectivity, colour and light—not from adding more architectural features.
A simplified illustration may show a façade as flat beige, dark grey and glass. The visualization can translate those areas into convincing stone, coated metal, concrete and glazing while keeping the original divisions intact. The key question is not “Which material looks more luxurious?” but “Which realistic material interpretation best supports the specified design?”
Useful decisions include:
- whether the pale façade reads as stone, precast concrete or painted render;
- whether dark vertical elements are glazing, metal cladding or recessed shadow zones;
- how reflective the glass should be for the viewing angle and time of day;
- whether bronze accents are structural frames, screens or applied trims; and
- how material joints relate to the approved façade modules.
If the source does not resolve these questions, the image should not disguise assumptions as confirmed specifications. The project team can either provide the information, approve an indicative interpretation or accept a clearly defined concept-level result.
Add Life Without Hiding the Design
Trees, cars, people, sky and neighbouring buildings help viewers understand scale and context. They can also be used to conceal uncertain architecture.
Landscaping should not cover the podium entrance simply because the modelling is incomplete. Atmospheric haze should not erase a roof profile that differs from the reference. A dramatic foreground should not push the towers out of their approved frame.
Context should support three objectives:
- establish credible scale;
- communicate the intended market position; and
- direct attention toward the design priorities.
The 3D exterior visualization work at Sporadic Studio is developed around project purpose—such as design approval, presentation or property marketing—because each purpose demands a different balance of clarity, atmosphere and context.
Lighting Should Reveal the Architecture, Not Repair It
Late-afternoon light can make a development feel premium, but it should not be used to manufacture a different façade. Strong shadows may exaggerate fins, hide repetitive errors or make shallow elements appear deeper than they are.
A reliable lighting review asks:
- Are important elevations readable?
- Do shadows explain the true depth of architectural elements?
- Does glazing reflect plausible surroundings?
- Are sky gardens visible without becoming oversized focal objects?
- Does the podium remain connected to the towers?
- Would the building still appear accurate under neutral light?
The final image may be atmospheric, but a neutral review version can help the team separate design accuracy from visual drama.
Use AI as an Interpretation Layer, Not the Design Authority
AI can accelerate exploration of sky, planting, mood, material character and photographic treatment. It is less dependable when exact repetition, floor counts, balcony alignment or multi-view consistency must be preserved.
The practical question is not whether AI is permitted. It is which information AI is allowed to interpret.
Low-risk areas may include general cloud character, distant context, planting variation and subtle surface richness. High-risk areas include tower outlines, façade grids, structural elements, floor divisions, openings and anything that will be discussed as part of the architectural proposal.
When an AI-assisted pass changes high-risk geometry, the result should be treated as a new concept—not a faithful enhancement. Professional judgement means recognising that boundary before the image reaches a client presentation.
A Review Process That Catches Design Drift Early
A controlled workflow can be reviewed in four stages:
1. Alignment draft
Show basic massing against the reference. Approve camera, crop, tower positions and overall proportions before developing details.
2. Geometry audit
Review the silhouette, sky gardens, podium, major façade zones and repeating modules. Mark discrepancies directly rather than relying on comments such as “looks slightly different.”
3. Material and lighting draft
Confirm realistic material interpretations, glass behaviour, daylight direction and landscape density. At this stage, architecture should already be stable.
4. Final presentation review
Check atmosphere, people, cars, vegetation, colour balance and final polish. Compare the final image with both the reference and authoritative drawings—not only with the previous draft.
For architectural rendering from reference image, a simple overlay or side-by-side audit is often more valuable than another round of subjective comments. It gives the team visible evidence of what remained fixed and what was intentionally improved.
What Clients Should Supply
To reduce assumptions, a useful package includes:
- the highest-resolution reference image available;
- latest plans, elevations and sections;
- current 3D or BIM model, if available;
- a note identifying the authoritative design source;
- a list of elements that must not change;
- confirmed materials or acceptable indicative directions;
- intended image use and audience;
- required output crop and resolution;
- deadline and review stages; and
- one person authorised to consolidate design feedback.
If the reference is already cropped, retouched or perspective-adjusted, that should be disclosed. Camera matching depends on understanding what happened to the source image before it reached the visualizer.
The Professional Value Is Controlled Improvement
The strongest visualizer is not necessarily the person who can make the most dramatic new image. In design-sensitive work, value comes from knowing what to improve, what to preserve and what requires confirmation.
Controlled improvement protects the architect’s authorship, helps developers communicate a credible proposal and reduces the risk of selling features that the project does not contain. It also gives reviewers a clearer basis for approval: they can judge the image as a representation of a known design, not as an unexplained redesign.
Conclusion: Realism Is Successful Only When the Design Survives
A reference image can be transformed through better materials, lighting, context and photographic discipline. But the test is not simply whether the new version looks more expensive or more realistic.
Successful architectural rendering from reference image keeps the architecture recognisable, traceable and reviewable while improving how confidently it can be understood. The closer an image moves toward photography, the more important it becomes to distinguish confirmed design from visual interpretation.
For professional teams, architectural rendering from reference image is successful only when the improved realism remains traceable to the approved design.